
Okay, I promised to post about the American Girl doll projects that we have created and now I feel ready to tackle it. It’s going to be long though so hang onto your hats.
In this post, I want to discuss the dollhouse that we made. After much humming and hawing about it and wondering how to go about it, I finally decided to make a go of it.
It all started with Pinterest as pretty much all of my crafting projects do. And then I saw this blogpost from CaughtMyFancy, I was sold. I was up in the air about what I even wanted to make the American Girl dollhouse out of. As everyone knows, it isn’t like any other dollhouse out there. In other words, you can’t just make it in a shoebox and call it a day. Some of these houses for the 18 inch dolls are huge so space must be allotted for them, whole rooms have to be rearranged sometimes. That’s why the decision to even begin this project was a big one.
Another dilemma I had was that I was trying to create an enormous dollhouse on an itty bitty budget.
So like I said, it all started on CaughtMyFancy where I got the idea that I could build a dollhouse out of a previously existing piece of furniture. This pretty much works with anything with shelves in it. We opted for a very ugly entertainment unit. We acquired one from Kijiji for $20. Here it is:

This was after we stripped it of its unnecessary front door and stuck a piece of plywood on the back to cover up the holes. The next step was to prime and paint it. We chose a girly purple colour. Mostly because that was the colour that we had on hand. It is the same colours as my daughter’s bedroom feature wall. Didn’t I say that we were on a very tight budget?


She was loads of help on this project! She was having a blast too of course. So we finally finished painting it. Our first room that I wanted to tackle was the kitchen. Remember, I had little to no budget so I scrounged up what I had on hand. Those supplies included the following:
A cardboard box the Wii came in
Some wooden trays that Melissa and Doug stampers come in. See an example of these here
Acrylic paints
A cardboard waffle box (these are surprisingly sturdy!)
Cardstock
Buttons
Scrap fabric
A broken plastic Polly Pocket suitcase
I bought some of what I think looks like tiny chair rail from Home Depot, too. It costed about $5 for a very long piece. I also bought two drawer pulls and some white subway tile backsplash that comes in a square, another $5.


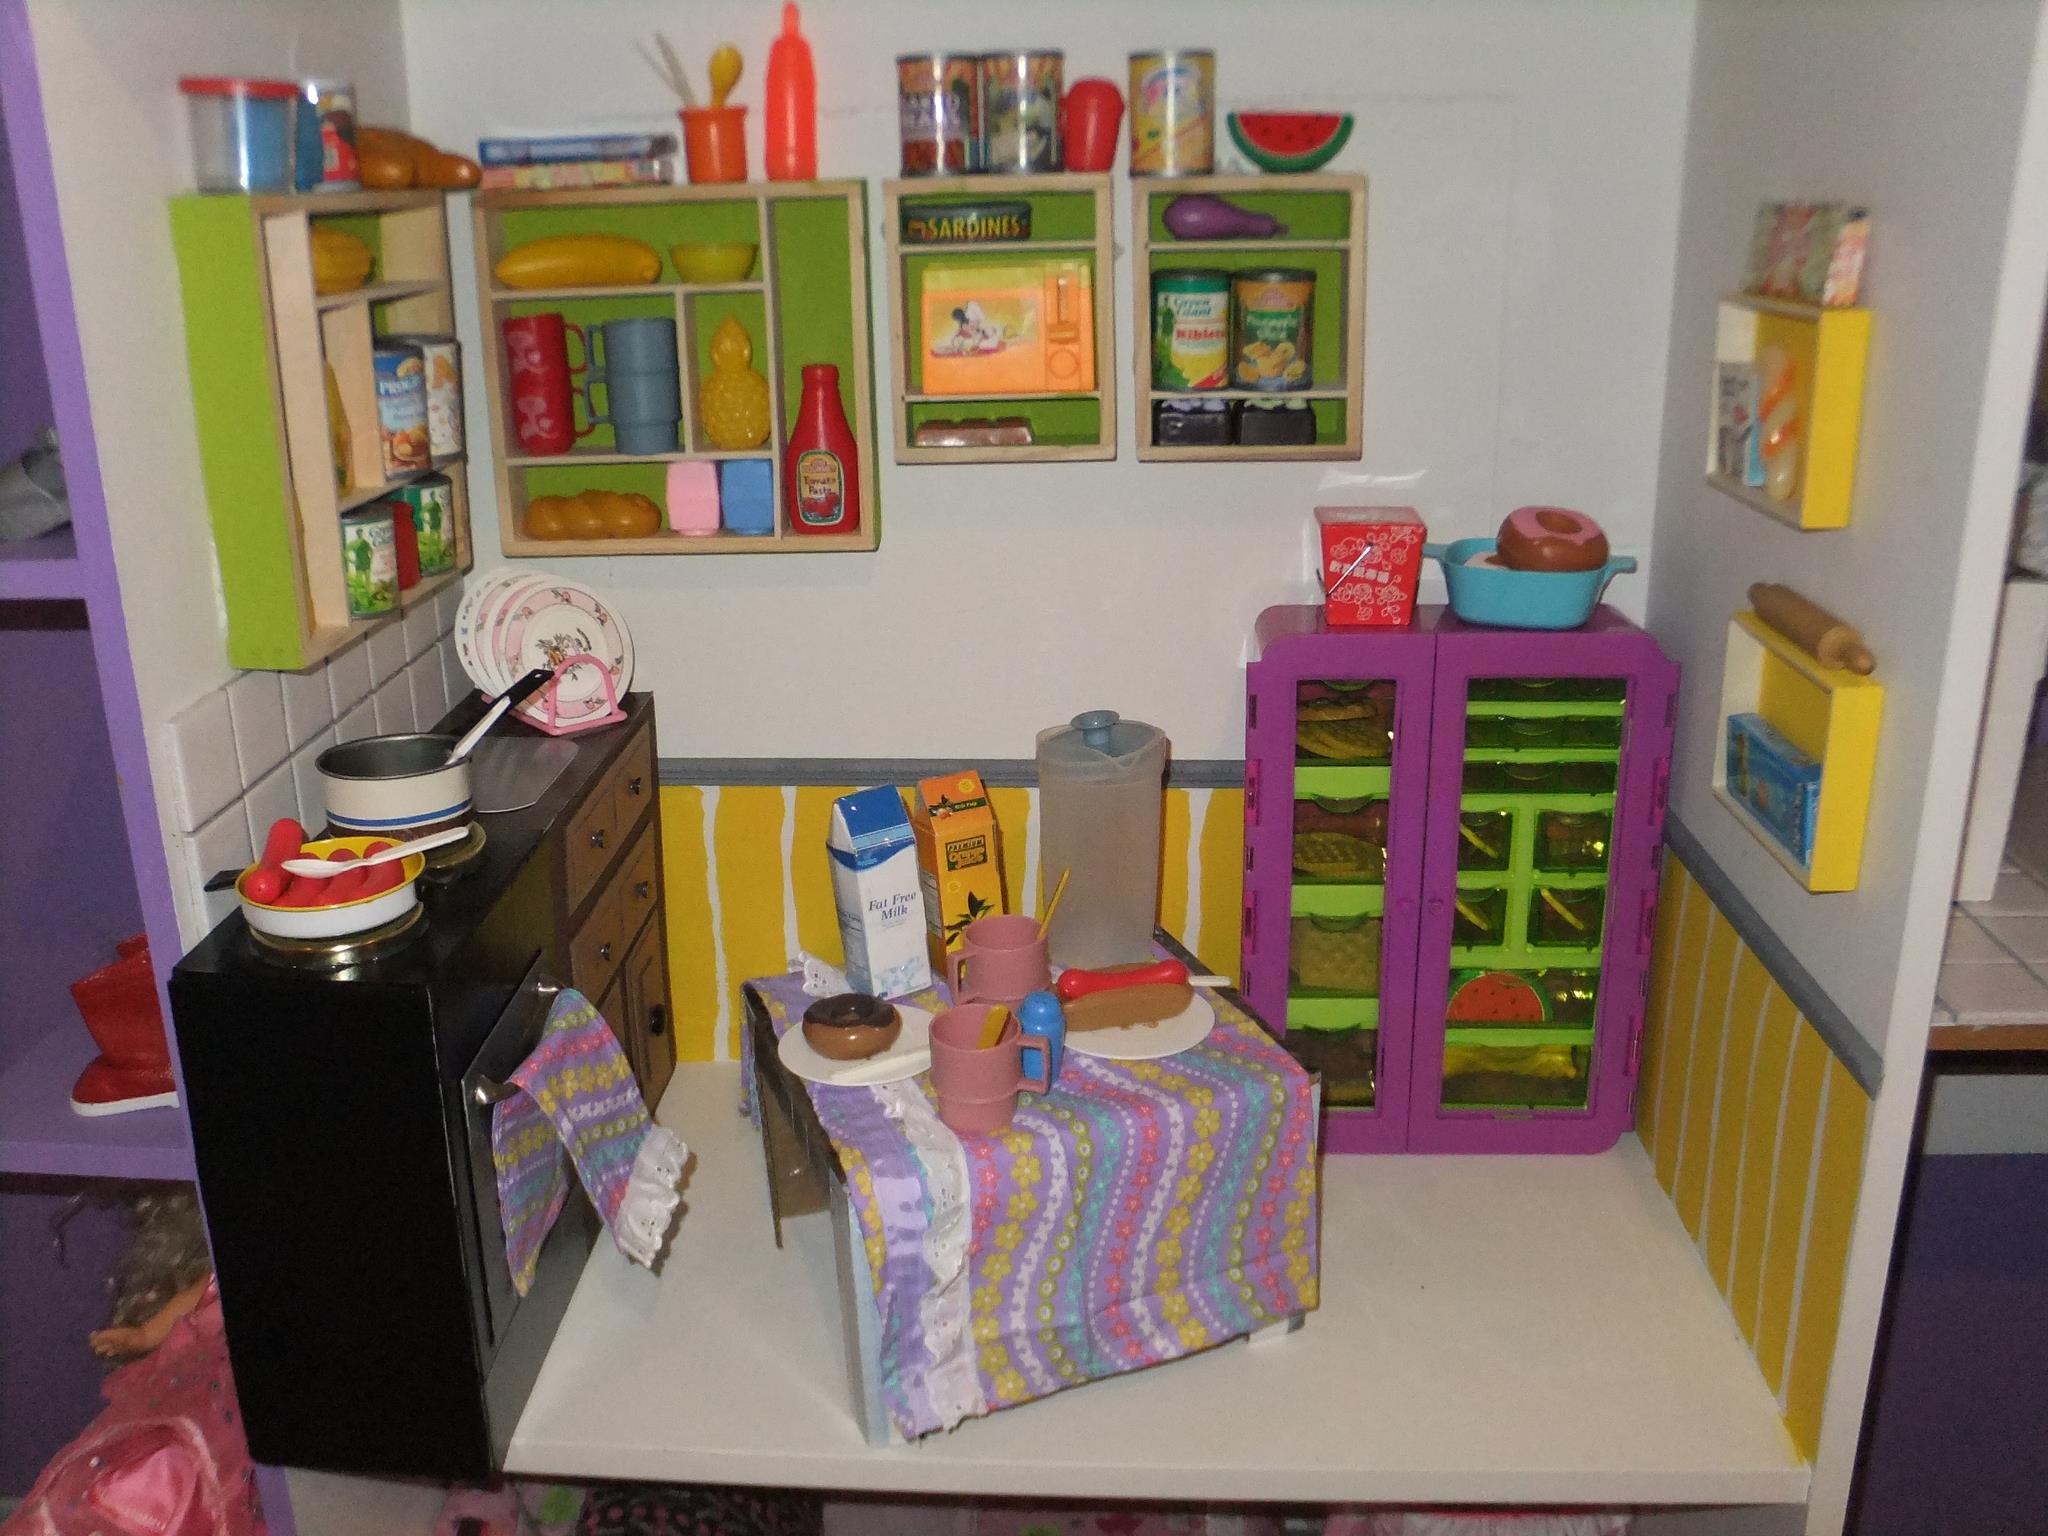
So let me just explain this. The purple and green ‘fridge’ is a broken Polly Pocket suitcase. The shelves on the walls are all the wooden stamp trays that the Melissa and Doug stampers come in. I just painted them up with some bright coloured paint. I am very proud that I found a use for those. I just love to reuse things and they match the yellow on the walls that i painted in stripes beneath the tiny chair rail.
You might never believe it, but if you pull out that kitchen sink/stove/counter combo and look behind it, you will actually see that it is the box that the Wii came in. I was going to affix it right to the wall of the kitchen, right under the white subway tiles that I glued onto the wall with Gorilla Glue, but it’s fun to show people the unfinished Wii box underneath. You’d never guess. It’s quite amazing.
I covered the entire front and sides of it in thin cardboard and painted the whole thing. Then I shellacked it with varathane. I added the drawers which are pieces of layered card with buttons glued on. The elements on top are jam jar lids. The oven door doesn’t open. It is just a piece of duct taped cardboard glued on. I added a drawer pull as an oven door handle and made a pretty towel out of some scrap fabric. I also made a matching tablecloth.
Sometimes a project just goes amazingly right and this was one of those times. I had no tutorials whatsoever to follow and yet, it just seemed to work. The bathroom sink worked in much the same way but I will get to that.
The table was hard to come by. I remember saying that in my first American Girl doll post that you can find here.
Tables and chairs for 18 inch dolls are very tricky to make and they are impossible to find, especially on a budget. This one is a waffle box that I covered with a card stock tabletop and varnished.
Since then we have acquired a plethora of tables and chairs.
We got a nice wooden table and chairs set from a craft show for $20. I also found a tall backed wicker chair at a thrift store for $1 that I thought was pretty cute. Lo and behold, I was in another thrift store a week later and I found the exact match to it, this one for $2. Not bad. I had a cute wooden chair with a heart shaped back that I had bought in a thrift store as well and I had nearly given up hope of ever acquiring a match for it when just last week I stumbled across an identical one at a flea market. What are the odds?
I guess that is what happens when you discover a shortage of something. We now have three tables, two wicker chairs, four wooden chairs, a wooden rocking chair and a stuffed armchair. Still, I haven’t blown my budget so it’s all good.
Onto the bathroom. Again I had zero budget so I had to scrounge. Here is what I found:
White basket
Small photo box
Card Stock
Buttons
Soap dispenser
Ceramic tile
Leftover white subway tile
Drawer pull
Sponges from Melissa and Doug stamper trays
Dollar store plastic mirror
Here is a look at the bathroom. Since this we have accumulated a pink Our Generation bath tub but I wanted to show what you can do on a budget.


The first picture is the bare bones. That sink is a photo box covered in thin card and painted white. Then I glued on the spongy inserts from the stamper trays for the top drawers gluing on buttons for pulls. I used a drawer pull as a towel rack.
I used the rest of the subway tile as flooring and tub surround. I would have done the entire floor but the large ceramic tile worked just as well and I think it offsets the subway tile nicely.(plus I had it on hand so it was free). I hung the dollar store mirror and put in tiny crown moulding too.
The bedroom was very small. It couldn’t be helped. It was decided that the dolls would only be sleeping in there anyway so it didn’t matter. Here is a pic. I used the inner organs of the Wii box and some cotton stuffing to make a mattress/boxspring. Then I purchased some fat quarters of fabric from Walmart to make the bedding.

I had some leftover carpet from our basement reno as well. The little vanity is a dishwasher detergent bucket. I just sewed a skirt for it.
We have two other doll beds that you can see over at my first American Girl doll post and this year Santa also sent us these bunk beds.

The final room in the dollhouse is the living room. It was a very small space as well. At first all I could manage was this:

Haha!
That’s that durable waffle box I was talking about. I added the rest of the subway tiles and some varnished marble painted card stock to the wall for a fireplace but then I ran out of steam. Hey, even this crazy crafting momma has to take a break once in a while.
When I did get back to it, I managed to pull it together but I still want to put a picture on the wall to cover up that hole. Here is the finished couch made from that waffle box with toilet paper rolls glued on for the arms, a small puzzle box for the ottoman and some leftover fabric I had lying around.

I am still unsure of what this room is missing. Maybe a TV above the fireplace and a picture on the wall will do the trick. We are still in the process of working on it, bit by bit. Again we added some crown moulding and chair rail. We had just enough of that stuff to finish all of the rooms, although I might go back and make some baseboards later. I think that would give it that finished look.
Here is the dollhouse complete. She is loving it!

I also made this little desk from a cracker box with the lid to the photo box that I used for the bathroom sink stuck on top.

Well that’s it for the dollhouse post. I hope you will try your hand at making a dollhouse for your 18 inch dollies. It’s loads of fun and if you are on a budget like I was, it can be super inexpensive.

She is one happy lady. Stay tuned for more excitement in my next post about American Girl doll food.

Nice job! Creating a dollhouse like this is so fun but sometimes overwhelming. It is all worth it when you see the final product – very cute!
LikeLike
For sure! This is a great dollhouse idea for someone on a budget. It took very little time and materials and the kids love it. 🙂
LikeLike
Amazing! Also…wow. You have 400 followers!
❤ Miri ❤
LikeLike
Yes, we are about to do a giveaway for that! 🙂 Stay tuned!
LikeLiked by 1 person