
Hey guys! This is just a quick post to summarize the basic construction of our new DIY Luciana’s Mars Habitat!
For this project you will need:
2 sheets of foam board
Exacto knife
Hot glue
Big pieces of cardboard
Large board of styrofoam (if you don’t have styrofoam, toilet paper rolls might work too)
Styrofoam blocks (wood blocks will work or empty duct tape rolls)
Okay, let’s begin!
Take one piece of foam board (mine were 30X20 inches manufacturer’s measurements. I just used them as is from the dollar store), and find the center. Use an exacto knife to cut a slot about 2/3 up the middle. Do the same to the second sheet of foam board. You can now slide the two pieces of foam board together to form an X as shown. Be sure that the top of your X is flush. If it isn’t, you might need to adjust the slots that you cut in the board a little. Once you have the X as you like it, run a line of hot glue at the center to secure into place. We wrestled with the idea of making ours foldable for storage since large ticket doll items always take up a lot of space, but in the end we decided to make it a permanent set up. We do have a spot in the doll room down in the basement where we can store it. Also, we really wanted a base for our habitat.
  To add the base, you are going to want two huge cardboard circles both with a diameter of one of your foam board sides. Ours as we mentioned was 30 inches in diameter. We always save any huge cardboard boxes that we get for doll projects. The circles don’t have to be perfect. We tried to rig up a large scale geometry compass using a pencil and a long piece of string, but our circles still turned out a bit wonky. Ah well.
  Hot glue one of the circles to the bottom of your X. To reinforce the floor, trace the second circle onto a large board of styrofoam. We had some from the packing materials that came with my daughter’s new desk.
If you don’t have any styrofoam board, we were debating using toilet paper rolls to reinforce the floor. Basically just cut the paper rolls about 2 inches high and glue as many as will fit on the circle. Kind of like this but without the toys. 🙂

Hot glue the second circle to the bottom of the habitat to cover the styrofoam/toilet paper rolls. Next, paint the floor of the habitat blue. I still want to wrap a strip of blue paper all the way around the side of my circle base to hide the styrofoam middle, but I was so busy with all the other crafting fun that I completely forgot. Although, I might see if I can find a matching blue duct tape to wrap around to cover the gap instead.
Finally, add some legs to your habitat. We had these blocks of styrofoam on hand, more packaging from my daughter’s desk. We just hot glued them onto the bottom. Hooray for reusing! If you don’t have any styrofoam, blocks of wood could work. We were contemplating using empty duct tape rolls for legs at one point too.

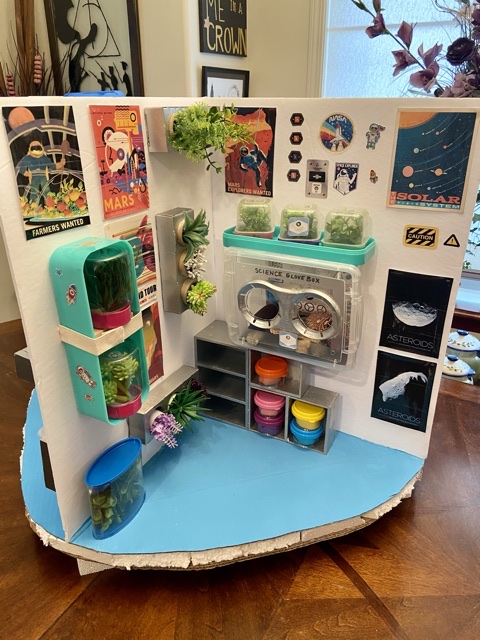
And the Mars Habitat is ready for all the details!! Stay tuned as we will be posting one room at a time, four posts total, to highlight all the crafty fun! (along with a whole lot of recycling) 😊👍🏻
I hope you enjoyed the tutorial! Science is an absolute favourite in our house, so we had so much fun building this!
Have a crafty kind of day!
Leave a comment below!
❤️❤️❤️

As Barney liked to say
LikeLiked by 1 person