

Hi guys! Are you ready for this?
Okay, so as you all know, we have been busy building a crazy enormous dollhouse in our basement. 🙂 Well, today we are here to show you the final reveal of our Mega Dollhouse Project as well as some tutorials on how to build one of your very own.
I won’t go into all of the finer details. Instead, I will leave a link below to where you can go on a tour of the dollhouse rooms.
So sit back, and relax! We are going on a huge dollhouse ride!
(Also, please bear with my photos. It’s kind of tricky to get good pics of a 20 foot dollhouse, and I’m no photographer by any means.) 🙂
Here was our initial plan:

Okay, I look at this now, and I have to laugh, because at this point I had no real idea of what I was doing. I just had this big dream, you know? LOL. 😛
(My husband thinks I’m crazy, and he’s probably right.)
So, what you see above are eight 4ft x 8ft pieces of plywood that we cut to the measurements shown. Now, we used 3/4″ plywood because I wanted to make sure that the dollhouse was sturdy in case someone decided to climb on top of it, or something.
Not that anyone should ever do that. Ever.
In hindsight, 1/2 inch plywood would have probably worked just fine.
(It might not have hurt so much when my husband dropped it on his bare toe either. It was at that point that he was out anyway, leaving me to be crazy all by myself)
You could also get a professional to do your cutting for you. 🙂
The plans above are for four 4ft x 2ft x 30″ boxes (green pieces) and four 2ft x 2ft x 30″ boxes (pink pieces). Be sure to notice in the diagram that there are four green pieces that are 4ft x 31.5″ and four pink pieces that are 2ft x 31.5″.
When assembling a room box, you have to be sure that the back piece covers the opening completely. I had to add 1.5″ to the back pieces to accommodate for the 3/4″ plywood edge. If you are using 1/2″ plywood, then you will only need to add 1″, otherwise the back piece will be too small, and there will be a gap.
Okay, enough mumbo jumbo. Here are some pics of assembly.

I used gorilla wood glue and 1.5″-2″ screws to assemble the boxes. Take very close notice of how I joined each piece of wood, because that makes all the difference for how the back piece fits on. The two sides should be inside the box holding the top and bottom pieces up. I hope that makes sense.
I flipped the smaller room boxes over onto their sides, because once I had assembled them, I discovered that I needed more floor space in those rooms. This way I have a 30″ wide floor and 2ft high walls instead. It also made the dollhouse a bit shorter overall, which was good since it was already pretty ginormous. 🙂

I assembled this thing right in place, because it was so dang heavy. 🙂
The wall that the dollhouse is against is 20 feet long.

Don’t mind the random horse in the dollhouse. LOL! 🙂
Here we were nearly done. I just had one more large room box to build.
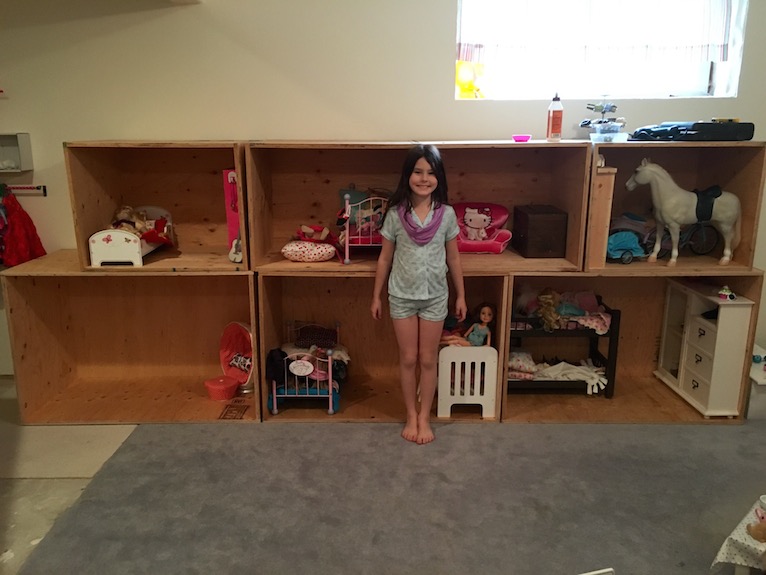
The Little Miss was getting really excited by this time. ❤
Once all of the room boxes were built, we arranged them how we wanted them. You can see that our DIY Grace’s Bakery fits perfectly at the very end. 🙂
Next, I used wood filler to fill all of the knots. Let me tell you, plywood has a lot of knots, so be prepared. Do not skip this step!! After it was dry, I sanded. Then I primed all the walls.
(If you are more organized than I am, you could do all of the sanding/priming/painting etc. before assembly)

It was time to choose the paint colours! I left this part up to the Little Miss. She did a pretty good job!
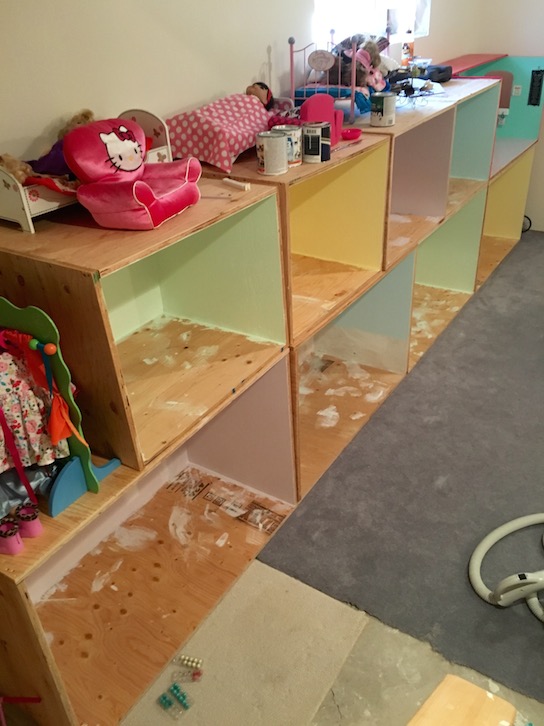
Lavender, mint green, yellow and sky blue. 🙂 So pretty!
(Invest in a good small paint roller)

Okay, that’s a really dark picture. The window in the middle of the wall doesn’t help either, but you get the gist.
I knew that all of the dollhouse rooms would have carpet except for the kitchen and the bathroom.

In the kitchen, I added some beadboard to the walls to look like wainscoting.
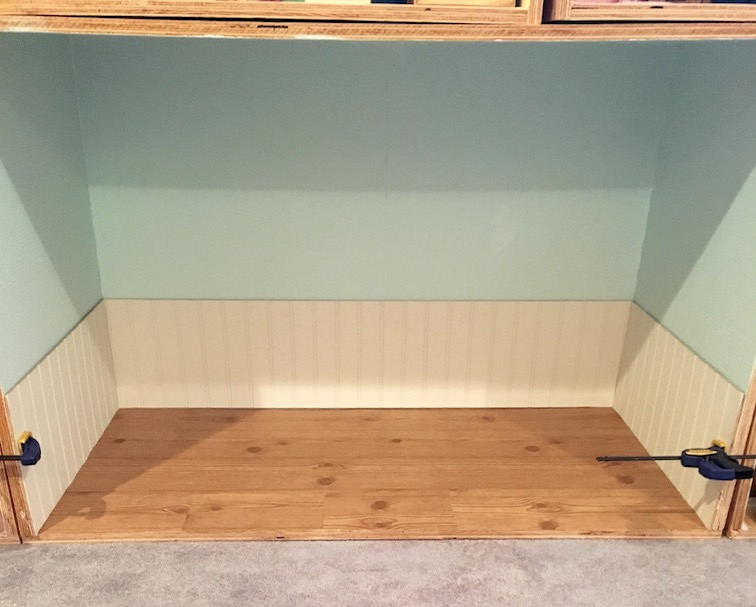
Then I glued down some contact paper flooring. I won’t go into all the little details, but it turned out really cute! 🙂
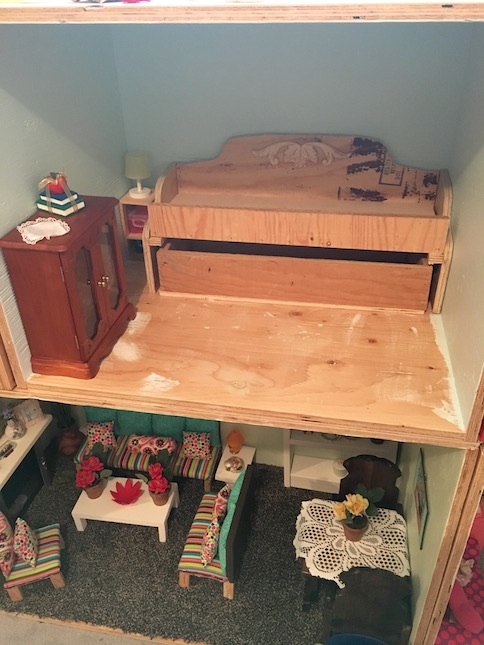
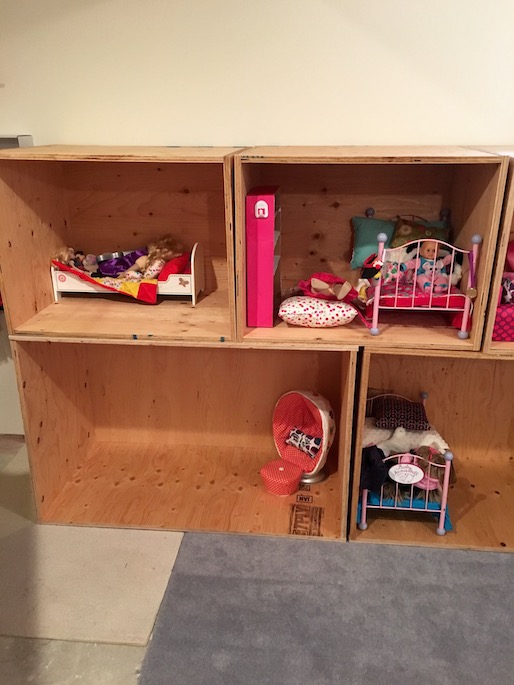
For the rest of the dollhouse, I decided to make a challenge for myself. I would finish one room in the dollhouse per week, if it killed me. LOL!
For the room above, I built a doll trundle bed to accommodate the two dolls who were going to be living there. 🙂

The dollhouse was coming together! 🙂 Some rooms quicker than others. I was beginning to really love the fact that everything seemed to be falling into place, and that everything had a place! Seriously fantastic storage solution. For real.

No doll accessories all over my basement floor! Hooray! ❤
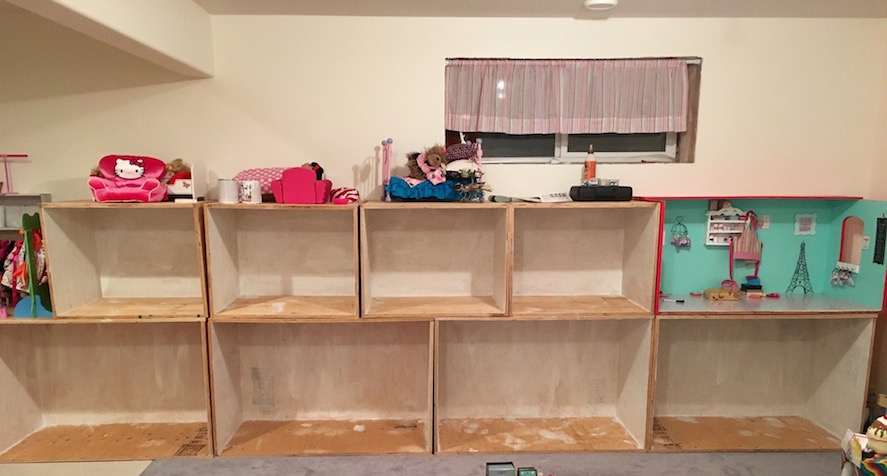
I was also starting to see storage possibilities on top of the dollhouse too. 🙂

This corner at the far end of the dollhouse was empty, so we decided that we could use the space to build a room for the historical dolls.
We used gorilla wood glue to install the dollhouse carpeting. We also installed contact paper for wallpaper.

Once all of the carpeting and wallpaper was in, it was time to accessorize! It didn’t take long to fill every little space in these doll rooms! 🙂
I was a bit floored that this project only took a matter of weeks, but once it was assembled and painted, it went pretty quickly.

Please bear with my terrible basement carpet. I refuse to install new carpet until the kids are older, and they stop spilling/colouring all over it. 🙂

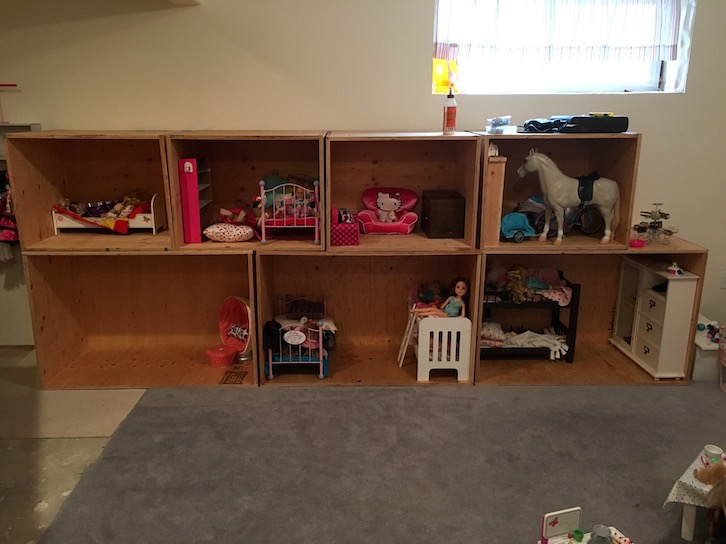
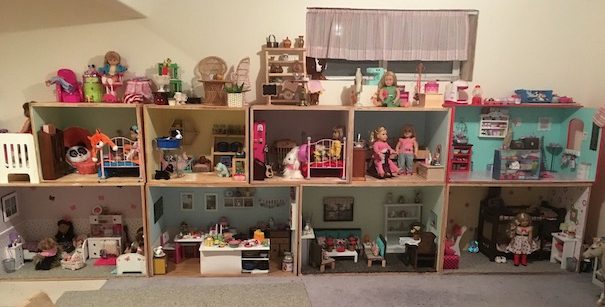
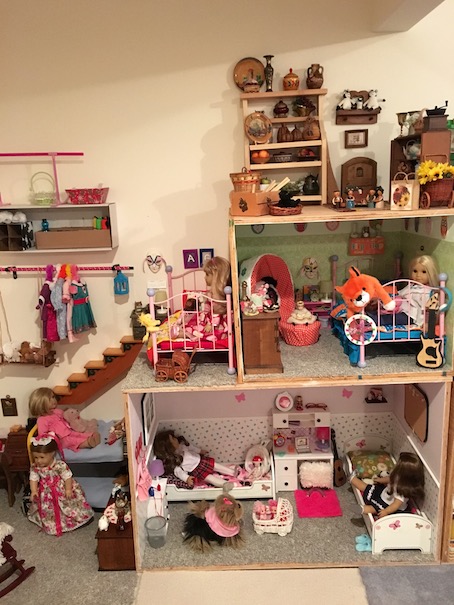
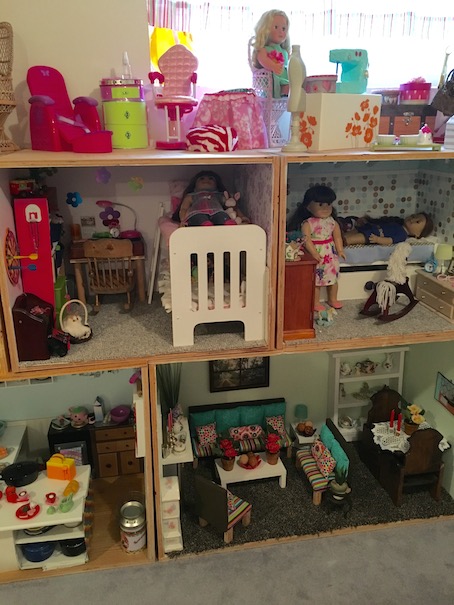
I tried to get some photos of the entire dollhouse. It’s tricky!
Here are some panoramic shots.

Full sized doll goodness! 🙂

I’m still deciding what to do about the top of the house. It’s kind of impossible for the kids to reach, so it doesn’t hold much play value, but it is a great storage space.

Over in the corner is the first dollhouse that we built along with our DIY Maryellen’s Seaside Diner. In the other corner is our DIY Lea’s Rainforest House.

We haven’t made any decisions regarding this dollhouse. For now, the Newberry dolls and the twins share it. We call it the doll condo. 🙂

We also built this loft bed for the dolls. 🙂
I hope that you enjoyed the finale of our Mega Dollhouse Project!
If you would like to read up on all of the adorable details about each of the rooms in the mega dollhouse, CLICK HERE
Also, stay tuned, because we have been building another dollhouse for the mini dolls, and we will have all of the fun details on that soon!
I hope that this inspires you to go out there, and build something! 🙂
Leave a comment below!
❤ ❤ ❤

Hi, did you pre-drill holes for the screws?
LikeLike
I didn’t, but you can if you want to.
LikeLike
wahoo ! so amazing final diaporama dollhouse ! i wish want to make the same for my smartdolls ! but my problem : smartdolls are too bigger than american dolls ! 24 inch for smartdolls and ony 18 inch for AGdolls ! but i love to recreate your doll food ! it is so amazing & very easy to make them .
LikeLiked by 1 person
I am so glad you love the dollhouse! 🥰 And I’m glad you enjoy making doll food! It is so much fun!
LikeLike
I built a house like this for my girls. If you stain the top of your room box and paint the sides you can add rooms just by spacing out the boxes. ☺ I wish I could add a photo of out house.
LikeLiked by 1 person
That’s awesome!! Since I built this, I’ve been sort of modifying the space a bit. I actually did what you suggested. I took out the bakery at the end, and put down some more carpet to make another room. I didn’t bother painting because the carpet already covered the raw wood. I put up a piece of contact paper on the one wall, but the rest of the walls were just basement walls, so they are already white. I love that they are separate room boxes. I actually have been slowly renovating the entire house. If I do want to sell it in the future, I can sell each room separate. Right now though we are having too much fun!
LikeLike
This is AWESOME! At the age of 57 and 3 granddaughters, this makes me want to play dolls every day with the grandgirls! They would think they were in heaven! The most I can do for them is make their doll clothes! I’m really speechless, it’s every little girls dream. Bless you, it shows a LOT OF LOVE!!!
LikeLike
Awww thank you so much! I am so glad that you enjoyed! Your little grand girls are blessed to have you! I am sure that they will always remember the doll clothes that you made for them with love. Have a lovely day! ❤ 🙂
LikeLike
This is a GREAT dollhouse! (literally and figuratively) ha. What an amazing project. We used the box rooms for our dollhouse as well. It’s nice because you can rearrange the house. Of course that almost never happens, but it’s still a great idea. Thanks for sharing.
LikeLike
You’re welcome! 🙂 I’m glad you like it! We are definitely not going to be rearranging our doll rooms either! LOL!
LikeLike
This is absolutely fabulous!!! Our home is so small that my dolls have taken over every room except the bathrooms! It would be wonderful to have a basement! You did such a great job making and arranging the rooms! How much fun it would be to play there! I hope you husband’s toe heals properly!
LikeLike
Thank you! His toe is doing much better now for sure! It is definitely a great storage space for all the doll things. The other little girls in the neighbourhood love to come to play! 🙂
LikeLike
I love the idea of boxes for the dollhouses, it makes it easy if further down the road you need to move it. Yours turned out great! I wish I had a wall big enough to do something like this, the drawbacks of a 1950’s style house.
LikeLike
Aw thanks! I definitely don’t want to have to move it! LOL! But you’re right, if I ever had to then I could!
LikeLike
I love the dollhouse. My late father made similar ones for our books. He did it with an old Victrola and television. Your husband is handy. Your dolls and furniture are so nice.
Marilyn
LikeLike
Oh my husband didn’t build it. He was out the minute a piece of wood fell on his foot. LOL! He’s definitely not as handy as I am with building projects. 🙂
LikeLike
WOW! What a beautiful project. Your basement is done so nice. I love the dollhouse. All of your dolls are cute. My favorite thing is that gorgeous horse.
Marion
LikeLike
Thank you! We actually got the horse at a flea market for ten dollars. It was an awesome find. 🙂
LikeLike
Oh, WOW!!!!!! That looks amazing! Great job! ❤ Thanks for showing us it! ❤ 😉
LikeLike
You’re welcome! I’m glad you like it! 🙂
LikeLiked by 1 person
That is incredible! You did such an AMAZING job! I am literally flabbergasted! 😀
LikeLike
Aw thanks! It was quite the job for sure but it turned out pretty great! 🙂
LikeLiked by 1 person
Makes me wish we had a basement! Where we live, there are virtually no basements, as we are too close to the water line and they tend to fill up with water. Not awesome. So my daughter’s dolls live in a corner of her bedroom. We are constantly rearranging things to accommodate them. Hers are only 14″ Hearts for Hearts dolls, and so far she only has three. Not sure there’s room for much more than that! This project is so super amazing. I really, really wish we had a space for something like this! I would definitely love making something like this. You guys did an outstanding job!!
LikeLike
Thank you! I am glad that you enjoyed it. I love Hearts for Hearts dolls! They are so beautiful and sweet! My daughter’s room is quite tiny, so I am glad that we could put the dolls in the basement, but I was the same, constantly rearranging things trying to reorganize the space. Finally, I just had enough of doll things all over the floor. 🙂
LikeLike
Wow, that is big! I would love to ‘build’ (aka put my brother and dad to work😜) but I have so little room, my sisters doll and my doll live on the floor, and in every empty corner there is a room. It works alright, except for when you open the door to much, and when it’s dark. They don’t have any walls, so you end up knocking over the whole room, LOL! 😝 😂
LikeLike
That is tricky! Maybe you could ‘build'(aka put your brother and dad to work LOL 🙂 ) a couple of the smaller room boxes so the walls don’t fall over anymore. I totally get the space issue. My daughter’s room is quite tiny. I am glad that we had the basement to work with. 🙂
LikeLike
Oh my goodness, this is fantastic! It makes mine look mediocre! Love the idea of using plywood boxes. We have a few more dolls now needing rooms, and not enough room in the dollhouse so may need to use that idea.
LikeLike
Aww thanks! It was a surprisingly simple build, just very heavy! LOL! 🙂
LikeLike