

Hi guys! I just wanted to do a very quick post on this before I head into a weekend of getting completely drowned in craft room organization. We are still up to our eyeballs in dollhouse renovations too. Oy. 🤦🏻♀️
But it’s always so tricky trying to prioritize teaching homeschool, book writing (yes, I have to do my full time job too, lol), running a household, raising a teenager and a dog (soon to be two dogs 😍) doll sewing, doll crafts, art and painting, blogging and social media, and taking doll photos which I have been discovering how to use all the options on my new phone, so I am hoping for better photos in the future. 🤞🏻
Anyway, does anyone else feel like their entire life is just one long line of unfinished business? Only me? Okay. 😂 LOL!
I’ve been told I have too many hobbies. I’ve also been told I have too many dolls, so I guess I will just agree to disagree on both counts.
Alrighty, now back to today’s craft!
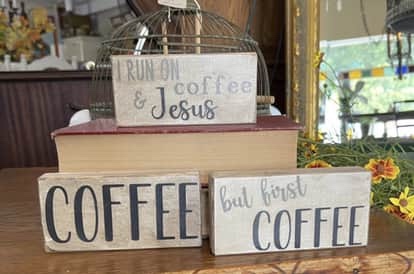
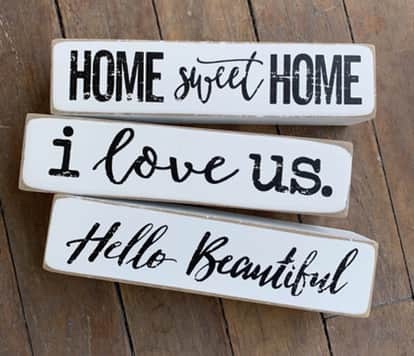
As I have mentioned before, we are loving the PBTeen (Pottery Barn Teen) aesthetic for our doll room renos, and this little sign is no exception! It is so cute and trendy! It is also so easy to make, so I just had to show you all how to make one too!
WHAT YOU NEED:
Tower game block (JENGA)
Paint
Tiny paintbrush (we used a #2 size brush)
Instead of paint, you could also use fine tip felt pens
It is really that simple!
First, paint your block. We used two coats of white paint.
Once your block is painted, decide what you want on your sign. We looked online for ideas. There are literally a million.


If, like me you aren’t very skilled at freehand, a cool trick I’ve learned is to trace your design with a pencil onto parchment paper.
Flip the paper over, and go over your design once more with your pencil, a bit heavier this time.
Flip the paper once more, and arrange it on your wooden block where you want your design to go.
Trace over your design again, and the pencil lines on the back of the parchment paper will transfer onto the wooden block.
Over the years, I’ve found this trick very handy for many, many purposes.
To avoid all the tracing and flipping and retracing, I often flip the computer screen so the image is already backwards.
Then I trace the backwards image, flip it over and transfer it directly to my wood surface.

Use black paint and a tiny paintbrush or a black felt tip marker to go over the pencil outline. Add in some other details with paint. We painted a little flower.

And you are done! Easy peasy adorable little sign for your doll’s room!

I hope you enjoyed this quick, yet crafty tutorial!
Now it is into the unknown for us! (aka the dark underworld of craft room organization!! LOL!)
Keep on smiling everyone, and have yourselves a crafty kind of day! 😊
Leave a comment below!
❤️❤️❤️

This is so adorable, thanks for still doing posts for us! 😊
LikeLiked by 1 person
You’re welcome!! I really love my little doll world and doll community. It’s my happy place amidst all the crazy busy! 😊
LikeLiked by 1 person
I agree with Lanette’s comment and think these signs are really fun. I think this is something that the girls could design and do on their own with really happy success, too. Thanks yet again, and may your “dark underworld of craft room organization” be more fun than it looks like at this point!
LikeLiked by 1 person
This is definitely something kids can do independently! If they don’t want to freehand, they can trace, or another idea is to cut out images and words from magazines, and glue them on. Then brush them over with a glue water mixture to seal them! 😊 Craft room organization is always the pits, but I didn’t do a good enough job the last time I attempted it, so this time I am really digging in my heels! Lol!
LikeLike
I LOVE this crafty idea! Saving it in my mental to do list lest I find myself further buried in dolls and crafts😂🤣 Thanks a million for this tutorial!
LikeLiked by 1 person
You are so welcome!! I know the feeling!! I always have a million ideas and only a scrap of time to do them in! LOL! 😊
LikeLike