
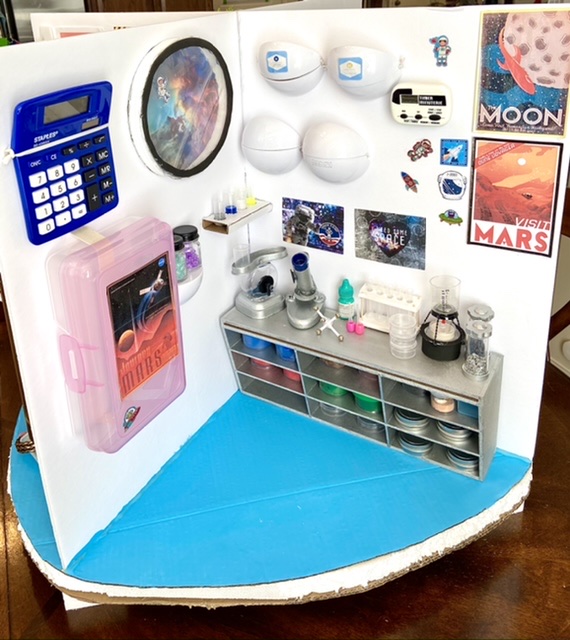
Hey guys! We are back with a tutorial for the second room in our DIY Mars Habitat! This is also one of my favourite rooms in the habitat.
Now I know that Our Generation sells a couple of pretty cute science sets as does American Girl, and any of those items would be awesome to use in the habitat lab. However, we had nothing science related for our dolls, (sad dolls!) so we had to get pretty crafty for this project.
This isn’t going to be a step by step tutorial, more of just an explanation of the materials we used. For months, I basically hoarded any scrap recycling items that looked space/science worthy, and I actually ended up using nearly everything in my stash. So yay! Recycling.
Okay, let’s get started! First, let’s talk about furniture and storage items. My mom found this mini storage shelf for us at a thrift store. We thought it might work as a lab counter, but the top of the shelf was pretty narrow. So instead, we flipped it over using the wider bottom as the top.
 We think it turned out pretty cute! We painted it silver to resemble a steel lab counter. We had some mini playdough containers as well as some mini metal tins and plastic glitter containers to fill our shelves.
 The inverted lab table even looks sort of space-age ergonomic. 😊
The storage cubbies in the lab are made with the domed packaging that Mini Brands come in.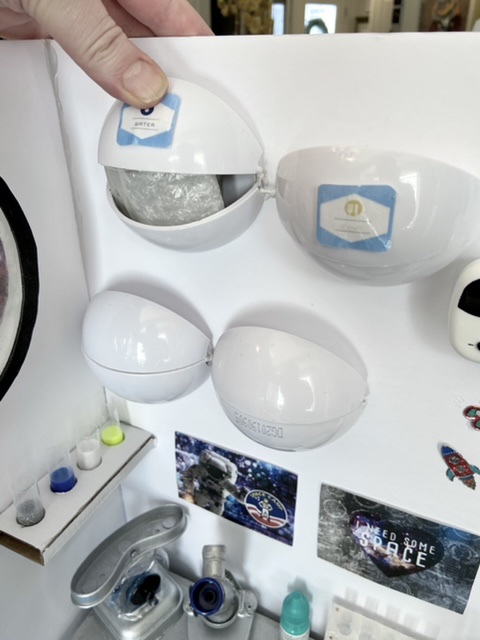
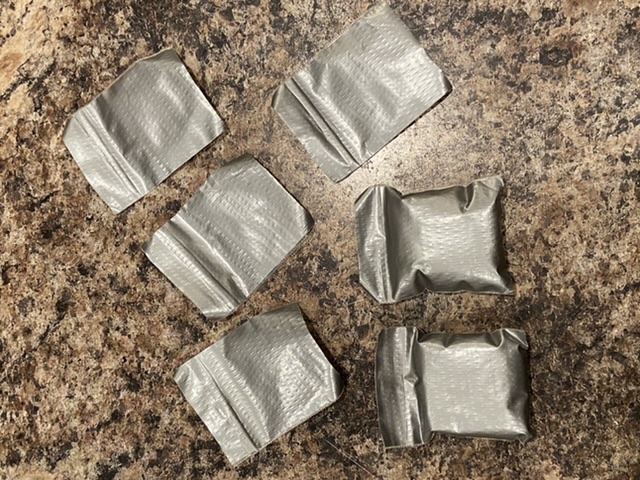
The top two cubbies are labeled water and food. We printed these labels from images of Luciana’s Habitat online.
To make doll astronaut food and water, we followed the tutorial over at BrandysHappyHome. The only thing we changed was adding silver duct tape to the back of the plastic baggies, and we didn’t use any straws, but that’s entirely up to you! Our foods are slime putty, and the water is bubble wrap. 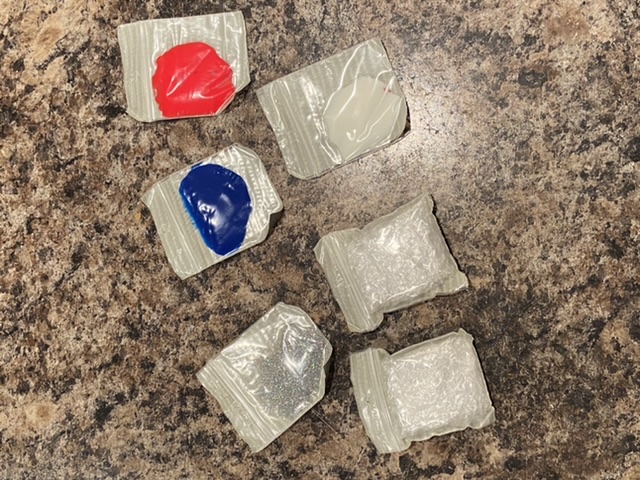
 Anyway, back to making the storage compartments. We just took two of the mini brand ball segments and hinged them together on both sides using a piece of elastic string.
It’s important to know that these ball segments come in two different sizes. We used the larger size for the bottom and the smaller size for the lid, or top of the compartment.

The ball segments have holes at the top and bottom, so they are easy to tie together. Do not tie these too tight or the elastic string will overstretch and the cubby will not open easily. We used hot glue to adhere the bottom segment of the cubby to the wall.
The top opens stretching the elastic and when you let go, the elastic retracts causing the lid to snap closed. The Little Miss had a lot of fun snapping these over and over again. Lol.
We used our last Mini Brand ball segment to make a shelf. Just hot glue it to the wall.

The storage fridge/cupboard compartment is made from a plastic pencil box. We had this one lying around, but the dollar store sells these as well.
 Again, we wanted things in the habitat to be removable so we looped some large waistband elastic through the wall to hold this in place.
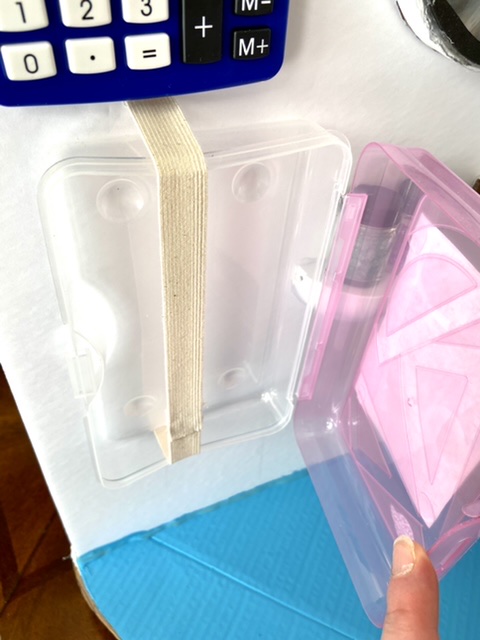
Here you can see the other side of the wall where there is another storage compartment, this time an old VHS cassette (what even is that??) case. 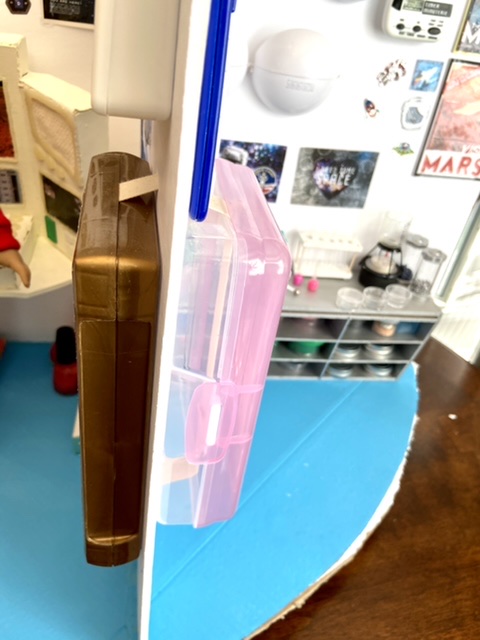 You could add shelves to your pencil box storage fridge if you want. We just left ours as it was.
Onto the accessories! This was the really fun part. Aside from printing posters and stickers from images online, we made a Bunsen burner with a beaker, some sample collection containers, test tubes in a rack, some pipettes/droppers, a microscope, a weigh scale, and a molecule model.
Let’s look at what we made from right to left on the lab table. First up, are the sample collection containers. We actually used the knobs off the drawers of the dresser that we revamped for the shelves in the habitat greenhouse for these. 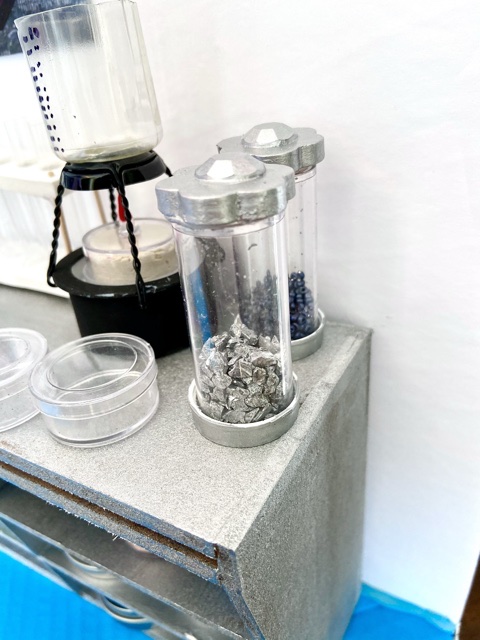
We painted the drawer knobs silver. 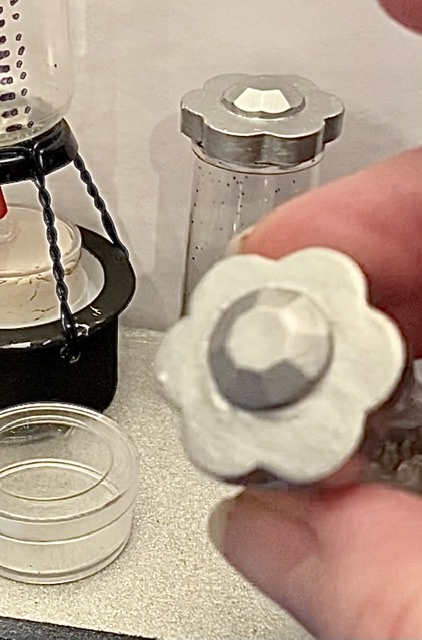 Then we hot glued the knobs to the bottom of glitter containers. We also painted the cap of the containers silver. Fill the sample containers with beads, glitter, pretty rocks, anything really. We filled one of ours with some decorative rocks, and the other with some beads.
We only filled a third of the container, but you can fill them to the top if you like. We also didn’t secure the lids on the bottom, but if you want to use some hot glue to do that so the decorative rocks don’t accidentally get spilled everywhere, you can.
To make the Bunsen burner we used an empty ribbon spool that we cut in half and painted black.  The flame is a hot glue drop secured to the bottom of a plastic glitter container. I had saved a lot of these little containers, but I’m pretty sure the dollar store sells them.
  We filled the glitter container with air dry clay so it wasn’t transparent. Then we hot glued it upside down on top of the ribbon spool. Add a spot of red or orange paint to the tip of the hot glue drop. The frame of the burner is a wine bottle cork cage.
  It actually clicks into place on the edge of the ribbon spool perfectly. No need to secure it.
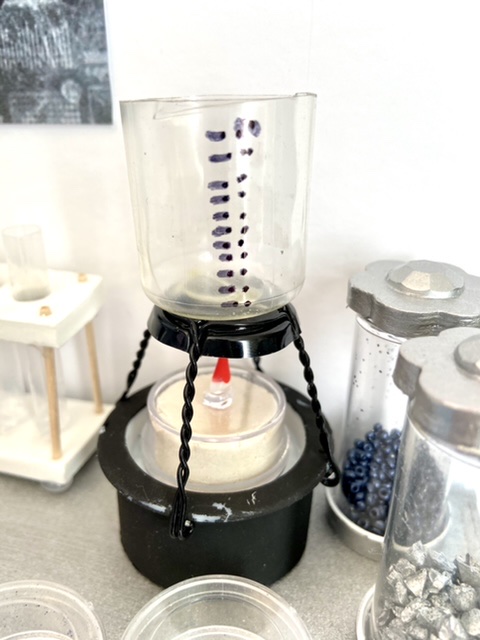
The beaker is just a small plastic bottle with the top cut off. Then we used a Sharpie to mark the measurement lines.
Test tubes were the real challenge. We couldn’t decide what to use to make the tubes. Our first attempt at making them was sort of a bust. 
We clipped off the fat ends of plastic pipettes and filled them with slime putty (The lab had sort of a playdough/putty theme by now). Then we built a sort of cardboard tray for them to sit in punching some holes in top.
I say this was a bust, but we ended up gluing the whole set up to the wall as a shelf anyway, so not a complete bust. I just felt these test tubes were too short and wide.  The next set of test tubes we made, we used the narrower part of the pipette. Of course this meant that at one point, our test tubes were just straws. To close off one end to make the bottom of the tube, we hot glued a small rounded crystal bead on there. If you don’t have crystal beads, a simple hot glue dot would work too.
To make the stand, we cut two rectangles of thick craft foam. We hole punched the top of one rectangle and fit the test tubes through the holes.

In hindsight, it might be better to use foam board or cardboard for this as craft foam is quite stretchy and it bends out of shape, but we were learning as we went and just using what we had on hand. We used toothpicks to connect the two rectangles of foam.
We decided in order to not compromise the integrity of the entire thing, to secure our test tubes inside the stand with a drop of hot glue on the bottom of each tube. We also plan on brushing different colours of paint inside each tube, but you can leave them clear and empty if you wanted.
The little pipettes are simply the tips of real pipettes cut off and stuck inside a pony bead.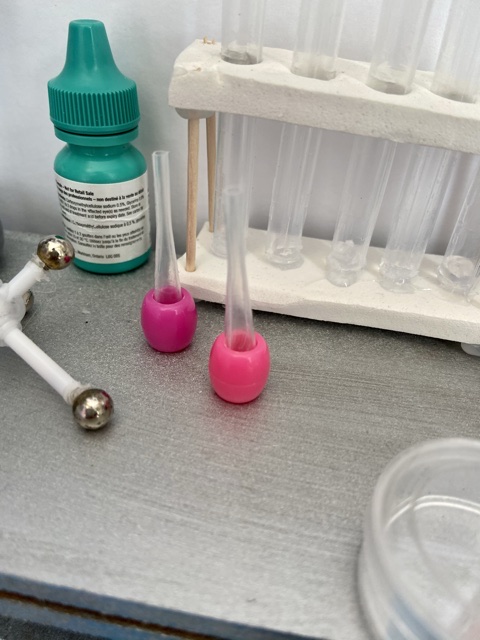
Simple as that!
The molecule model is made of plastic lollipop sticks and round steel ball push pins. If you don’t have these pins you can use beads.
We stuck one ball pin in each end of a lollipop stick cut to size. Then we glued two sticks together to form an X and a shorter lollipop stick with another ball on the end secured at either side of the center of the X.
This doesn’t have to be perfect. You could look at some molecule model images online to have coloured sticks and beads, but we were just using up whatever we had on hand.
Doll microscope.
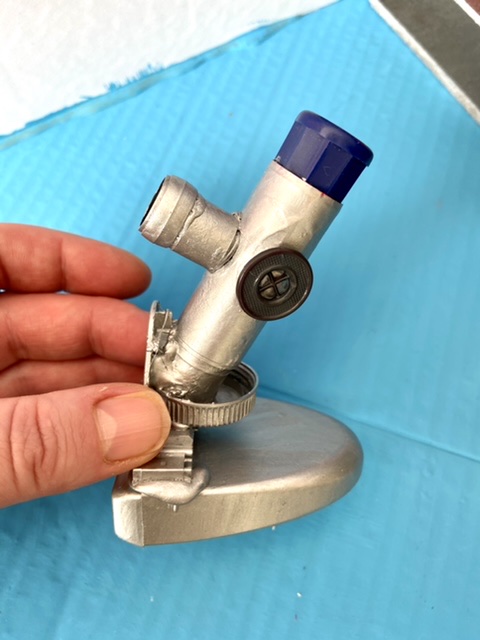
This one was literally the easiest to make. All we used was an empty glue stick, an empty floss container, a plastic bottle cap, a button and some beads.
Take the floss container apart and there is this weird plastic triangle bit inside. Use hot glue to secure that vertically at the wide end of the floss container.  Hot glue the plastic bottle cap as the microscope tray. Then hot glue the empty glue stick container at an angle inside the plastic bottle cap. The twisty part of the glue stick is the top of the microscope lens and it really turns so your doll can pretend to focus the lens!
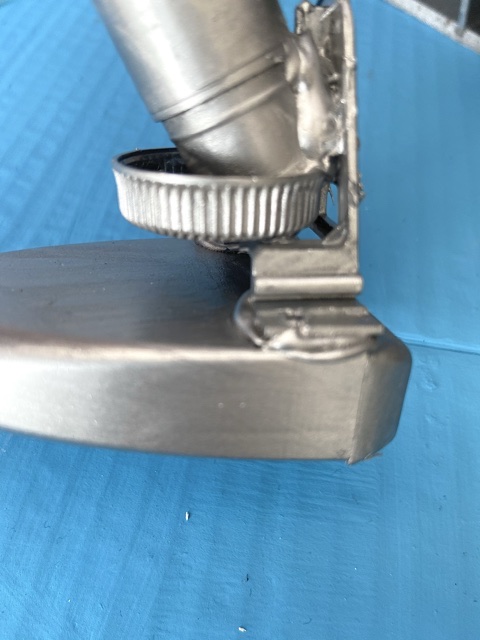 For the second lens, we had two cylindrical beads that we hot glued to the top of the glue stick. Paint your microscope any colour you want. We chose silver. Then we glued a black button on the side as an adjuster knob. So cute!
Doll weigh scale.
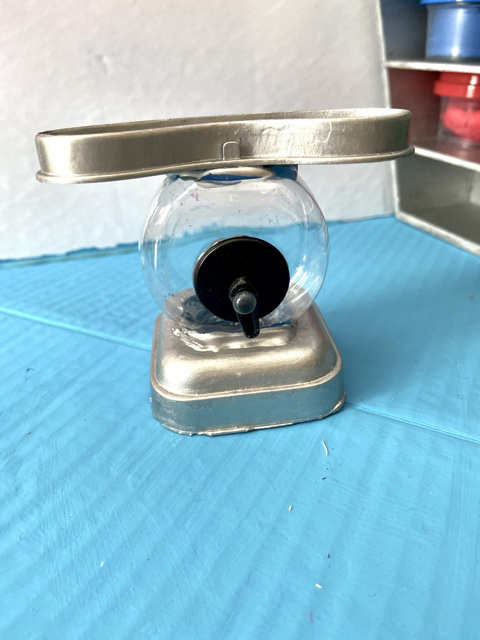
This one was just me fiddling with a bunch of leftover scraps. A lid from one of the plastic plant containers in the habitat greenhouse, a random plastic bottle, the plastic piece from inside the plant aquarium in the habitat greenhouse, a plastic golf tee marker, a plastic dial. Here’s what it looked like without paint.
Last is the portal window.
We had a white plastic ring strip from a plastic bucket of cookie dough, but you could use cardboard, or anything sturdy that you have on hand. We printed an image of space from online, and glued it to our plastic ring trimming the overlap.
Then we glued the other side of the ring to a piece of flat packaging window plastic. Last, we traced the ring on a piece of black craft foam, cutting it out to create a black ring for the edging.
I hope you enjoyed! I hope you didn’t get too bored! Stay tuned as we explore the Mars Habitat further!
I really hope everyone is doing well.
Keep smiling, and have a crafty kind of day!
Leave a comment below!

This is so good! You did a great job on everything and I love how detail it is!
LikeLiked by 1 person
Thank you so much! 😊❤️
LikeLiked by 1 person
Brilliant! Your habitat I’d fabulous! Thank you for sharing your vision and ability to repurpose with us! You rock!
LikeLiked by 1 person
Is not I’d…ugh.
LikeLike
This constantly happens to me too!! 🙂
LikeLike
Thank you so much!! 🙂 ❤
LikeLike
Every single bit of this habitat is clever and inspirational. Thank you so much for sharing your ideas and triumphant results with all of us. One of my Granddaughters and I were sorting through AG clothes and accessories yesterday and she came across a doll locker she had made a few years ago. She said, “Oh, I just love this, it is absolutely my favorite doll thing!” Her doll locker was made from a shoe box with no fancy bits and pieces added, yet it is her favorite because she created it herself. She’s approaching her 17th birthday now and her life is including much more than just her dolls, sigh. It makes me excited that she still wants to be creating for herself. My own favorite doll’s clothes are some I made (badly) by hand when I was 7 & 8! I was just thrilled with them and my dolls wore them often. I’m really glad that you and your daughter have made this together, and congratulations!!
LikeLiked by 1 person
Thank you!! I agree! Handmade are always the best things! My daughter always says mom, I know that you could make that ten times better. She has such faith in me! LOL! I just love that DIY gives us such freedom to add whatever we like and to make it whatever colours we want. My daughter is also growing up and away from the dolls. She still enjoys crafting for them with her mom though, and she is still very much interested in their fashion, so we like to design and sew clothing for them together too. 🙂 ❤
LikeLike