
Hi there! Since we’ve been happily making doll food this month, I realized that we still owe you a doll cake tutorial!
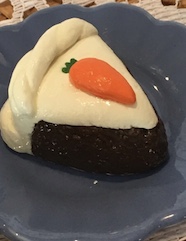
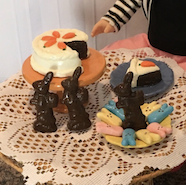
Remember back at Easter, when we made the little carrot cake? If not, here are a few pics to remind you, or you can just go to that link HERE. 
 Anyway, since then we’ve made a few other little cakes in the same way, and they’ve turned out so adorable that we definitely wanted to share.
What you need:
White air dry clay (we use Model Magic purchased from Michael’s)
Large duct tape roll
Exacto knife
Cookie cutters
Silicone molds (these are optional, we purchased these on Etsy)
Large kitchen knife
Acrylic paint
Sealant (we use Sargent Acrylic Gloss)
A Good Chunk of Time (First, be sure that you set some time aside for making these cakes because it’s not exactly something that you can put down, and take back up again the next day. Air dry clay does just that, it dries. So if you set the project down, the next day you won’t be able to finish it as it will already be dry. Second, these need time to dry. A few days, or even a week at least. I suggest making a whole batch of them, and leaving them out to dry. Then you can paint them all the next week.)
That’s all the supplies that we used to make doll cakes, but you can find all kinds of tools for working with air dry clay when making doll food. Toothbrushes work wonders for adding texture. Toothpicks are also great for pressing lines and using as a poking tool. Large straws can be used as circle cutters. So can toilet paper tubes and other smaller cardboard tubes. Paperclips can be unbent, and used as a poking, or a dotting tool, too. It just goes to show, you don’t need anything fancy to make something that looks great!
Okay, let’s get started!!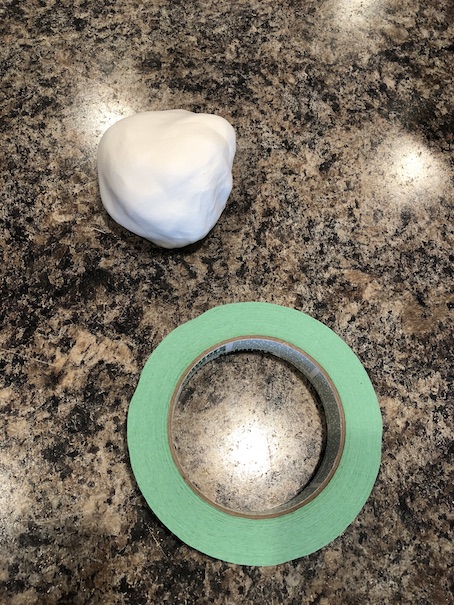
I mentioned that a large duct tape roll was needed but as you can see by my picture here, I didn’t have one on hand. It is much easier to do using a large duct tape roll so I highly suggest using one if you have it.
Start out by taking a large ball of clay. Be sure that it is large enough to fill the centre of your duct tape roll about 3/4 of the way up the inside. 
Squish your ball in there, shaping the top nicely. You will see in a moment why a duct tape roll works better for this, but the green painter’s tape roll was all I had at the time of making this specific cake, so I had to improvise.
Dear Husband, Please don’t throw out the ends of my duct tape rolls. Love from your darling Wife. ❤

Gently remove the duct tape roll. See that line there? Yours will not have that. Yours will be all nice, and smooth, and perfectly shaped. Yours will look more like this. This was after I reshaped it by hand a little.
Quick Update: As soon as I posted this, I found a duct tape roll! So here are the pics!

 At this point, you will have to pull gently at the sides of the top of the cake all the way around to expel the clay out the bottom of the tape roll. Just keep pulling gently all around the sides, and gently push it out of there. It will be a bit deformed when it comes out, but not much. Also, once it comes out, turn it upside down, and use the flattened part as the top of the cake. Reshape a little if you need to.
Now if you don’t want your cake to have a slice out of it, then skip this next step.  Take your kitchen knife, and gently trace out where you want to cut your slice.
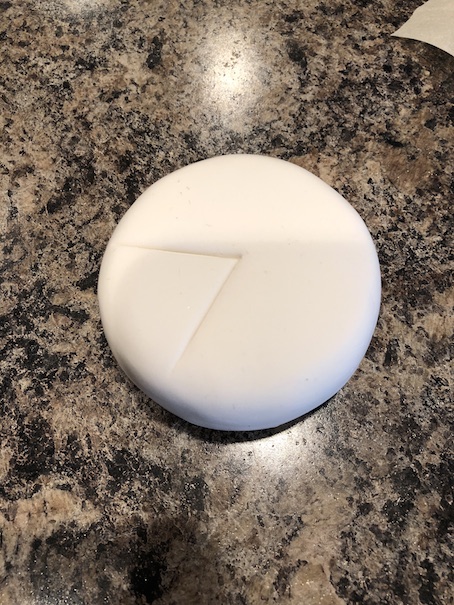 Next, holding the knife vertically, gently cut into the cake. I don’t hold the knife horizontally, as it squishes the cake too much. Instead, I stab it in there a few times along the line that I cut.
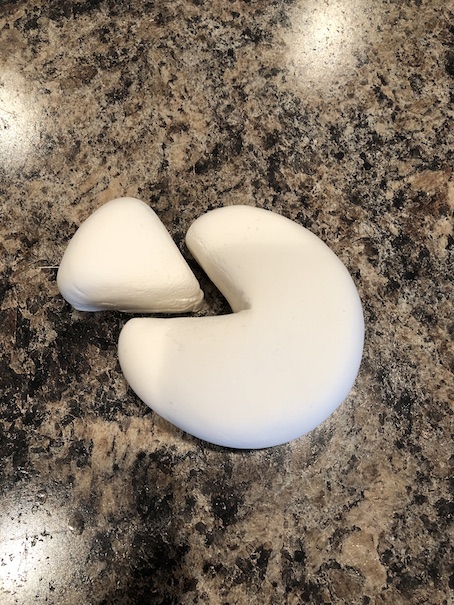
 Do this gently until the slice separates from the cake. Now no one is perfect, me included, so I’m not going to lie. The cake as well as the slice itself is going to need a little bit of reshaping after this bit, but it’s not going to be completely misshapen. It should be easy to coax back to life. Just use your eye, and your judgment. Now it should look like a wheel of cheese!! Or PacMan. LOL! 🙂
Now it’s time to add the texture! We will refrain from picking the cake up at this point forward. That’s a rule for working with clay. Bring the tool to the clay, not vice versa. This prevents unnecessary finger marks, and accidental squishings.  And of course, just after I tell you that, here I am holding the cake up for you to see. LOL! If you do need to pick up your cake to mark the lines where the texturing is going to go, that is fine, but put it down right after, and use your texture tool to poke and pull at the clay, giving it a cake-like look.
 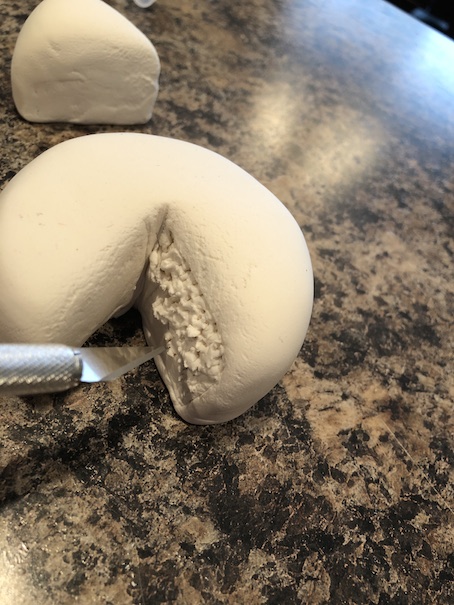 I use the end of my exacto knife for texturing air dry clay. You can use a dotting tool for this, or even a toothpick. Just poke, and pull at the clay in swirls until you get the look you want.
  Don’t forget to do the same to the individual slice. Mark the lines, and then texture the space inside the lines.
  All done! Are you still with me? 🙂 Next, we are going to add the icing!
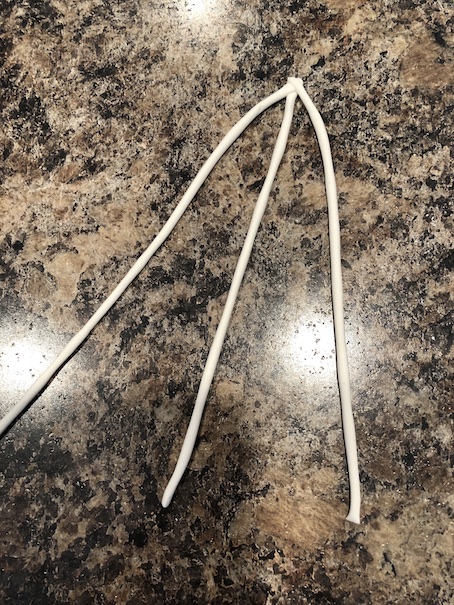 There are a couple of options for icing. Triple braid, double braid, or silicone mold. For this specific cake, we decided to make a triple braid. We rolled out three thin snakes. We attached them at the top, and then we just braided them like you would hair.
 Take your braided strand, and wrap it around the bottom edge of your cake.
 Be sure to press it on there well to create a good hold. Do not pick the cake up to do this. Just wrap it around, and press it on there.
 Don’t forget to do the same for the individual slice.
 As you can see here, the ends of the braid are cut off, and molded right around the cut edges of the cake. Again, press it down well, so that it adheres nicely.
Now it is time to decorate!! You can do anything you like!
The carrot cake above is a thicker double strand braid, so it all depends on the look that you want. I also used the double strand braid to make a second icing strip to go around the top of the cake.
This cake was made using a duct tape roll, so the top is a bit flatter which made it easier to attach the second braid.
The carrots I fashioned by hand. They are just teardrops. The stems are green paint added with a tiny brush after.
 Here is another cake I made. It has a layer of icing in the middle. I just drew a line down the centre, and didn’t add texture to that bit. The snowflakes on top are made with cookie cutters, one large and one smaller. Just remember to cut some pieces out of the shapes to put on top of the individual slice. This cake is a bit more rounded.
Okay, back to the cake that I am working on right now.
 Here is the little silicon mold that I had on hand. I like these molds. They are flexible, and easy to use with clay.
  They are great for adding detail to your doll food. 🙂
 So realistic!
 Cute, but this cake needs more!
 Cookie cutters work great for cake decorating! Also, this is one of my tinier whip cream molds. I used to make dollhouse miniature food, too. 1:12 scale. Now those were tiny! 🙂
 The flower cookie cutter piece adds a bit of height to the top of the cake. Be sure to cut out the corner though to add to the individual slice. I also added a strawberry in the middle which I also had to cut a little piece out of to put on the slice.
Once your cake is finished. Set it aside to dry. After a day or so of drying, turn it upside down. This helps the bottom of the cake to dry out, too.
Mine isn’t ready to be painted yet. I usually wait a week, or even ten days. That ensures that it is dry all the way through.
I’m probably just extra paranoid because I make mine as gifts, so if you can only wait a few days, then so be it. The thing about air dry clay is the longer it is out in the air, the harder it becomes, so even if you paint it a little early, it will still cure more over time.
Add varnish, and you’re done!
I hope you enjoyed today’s tutorial! I hope that there are many little doll cakes in your future too!
Keep smiling, and have a crafty kind of day!
Leave a comment below!
❤ ❤ ❤

Very cute!
LikeLike
Thank you! 🙂 ❤
LikeLike
Cute craft!
LikeLiked by 1 person
Thank you! 🙂
LikeLiked by 1 person
Looks amazing… can’t wait to try some on my own (I hope mine comes out as good as yours do )
LikeLiked by 1 person
I try to make my crafts as easy as possible so that anyone can do them. I hope yours turn out well too! 🙂
LikeLiked by 1 person
This is sooooo cute! I will definitely try this sometime!
~KaylynGrace
LikeLiked by 1 person
Hooray! 🙂 ❤
LikeLiked by 1 person
Thank you for sharing.
LikeLiked by 1 person
You’re very welcome! 🙂 ❤
LikeLike
Dandy!
LikeLiked by 1 person
Thank you! 🙂
LikeLike
I just LOVE this! It looks easy so that even I could do it. lol If I ever get around to it, I’ll try to put photos on my own doll blog and send you a link. Thanks so much for the explanation and all the lovely photos!
LikeLiked by 1 person
Yes you definitely can do it! I look forward to seeing yours! 🙂 ❤
LikeLike