
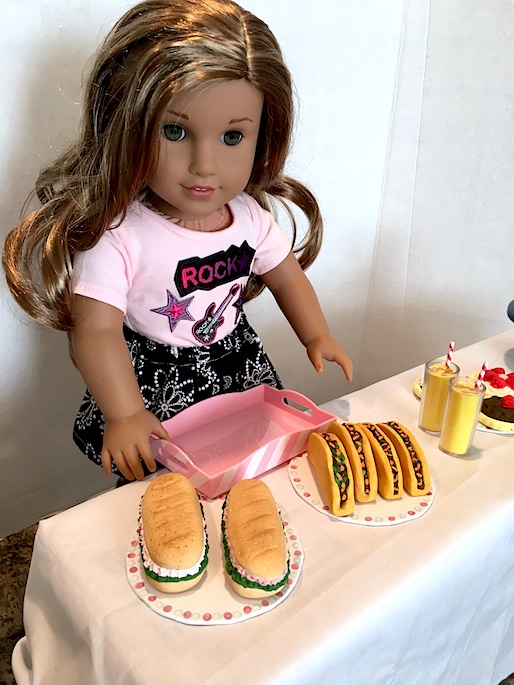
Hi guys! Lately we’ve been busy making food for our dolls, so today we wanted to share some tutorials on how to make doll sized sandwiches and tacos!
Recently AG released a very cute cooler set that features submarine type sandwiches, as well as a hot lunch set that comes with doll sized tacos. They were absolutely too cute to resist, so we thought that we would try our hand at making some!
DOLL SUBMARINE SANDWICHES
To make doll sandwiches you will need:
White Model Magic Air Dry Clay
Toothpick
Chalk pastels (optional)
Acrylic paint/tiny paintbrush
Clear gloss varnish
Okay, let’s begin!
Step 1: Take a good amount of clay, and roll it into a ball.
Step 2: Roll your ball of clay into a sausage about 3 inches long, and 1 inch thick.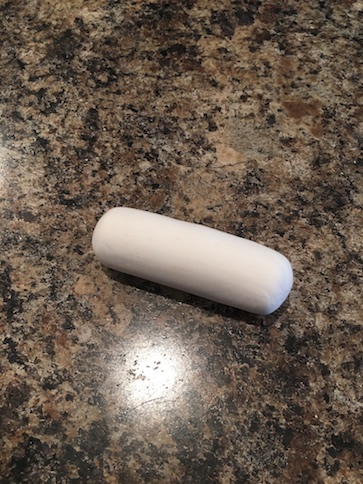
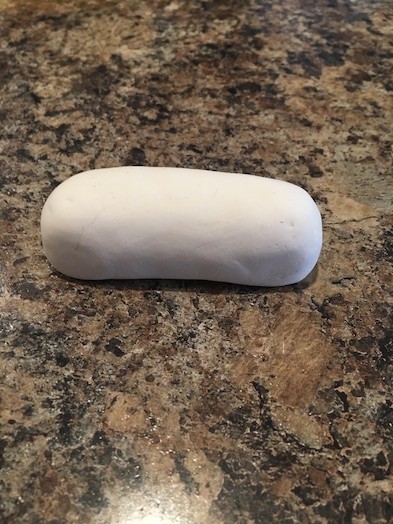
Step 3: Flatten the bottom of your sausage, and round off the sides to look like a bun. I made my sandwiches 3 inches long, 1 inch wide, and just under an inch high.
Step 4: Once your bun looks how you want it, turn it on its side. Using a toothpick draw a line all the way around your bun close to the bottom. This creates the indent of the bottom bun of your sandwich.


Step 5: Next, take your toothpick, and do the same thing around the top of your bun. This creates the indent for the top bun of your sandwich. In between these two lines is the sandwich filling.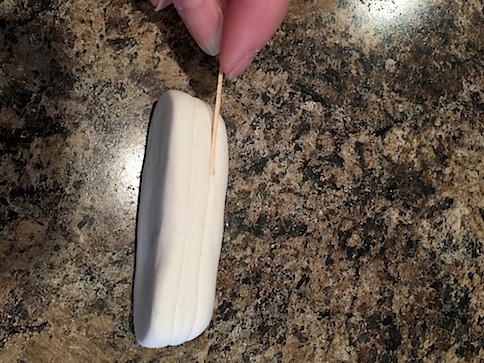
Step 6: Here is where I stop touching the clay so as not to accidentally squash it. Place your sandwich on a flat surface. Using a toothpick, texture the space between the two lines that you created in the bun. I just poke and pull and dig gently at the clay with the toothpick until it looks wavy like lettuce. Do this all the way around your sandwich. 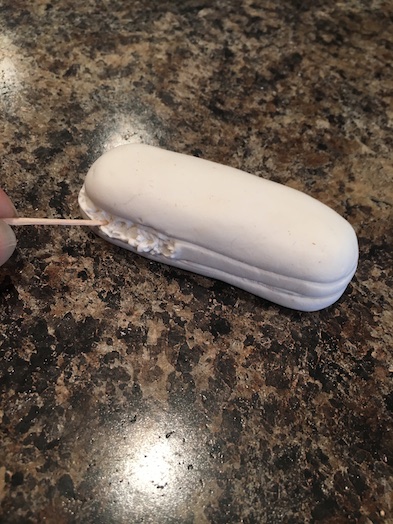
Step 7: Once your filling is completed, use the toothpick to make tiny holes in the top of the sandwich bun.

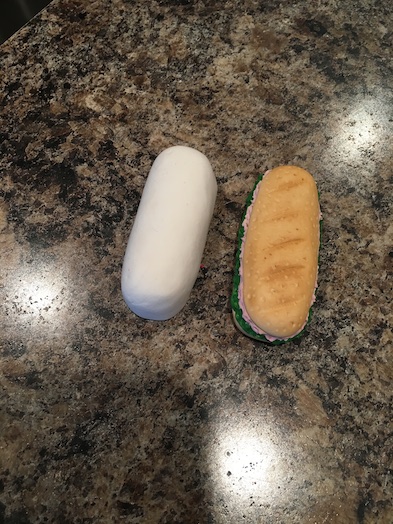
Step 8: Use the toothpick to make short baking lines in the top of the sandwich bun. Set your sandwich aside to dry overnight, or longer. Be sure that it is completely dry before you handle it. (I like to make all of my model magic projects all at once, and then just leave them all aside to dry as a big group)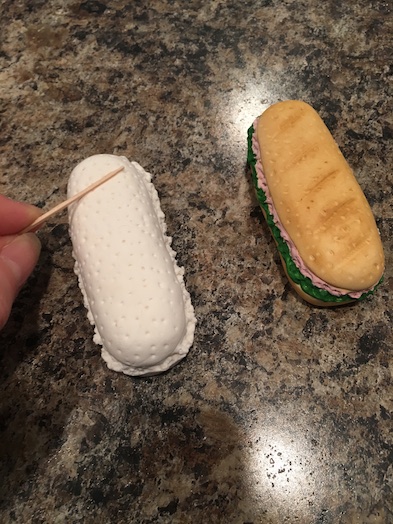
Step 9: I mix brown, yellow and orange chalk to colour my bun, but you don’t have to. You can just mix paint to get the colour you want instead. Brush the chalk on darker in between the baking lines on the top of the bun. I mainly use my fingers to brush it on. Don’t forget to do the bottom of the sandwich too. Don’t worry if some of the chalk gets on the filling area of the sandwich as this will be painted anyway.


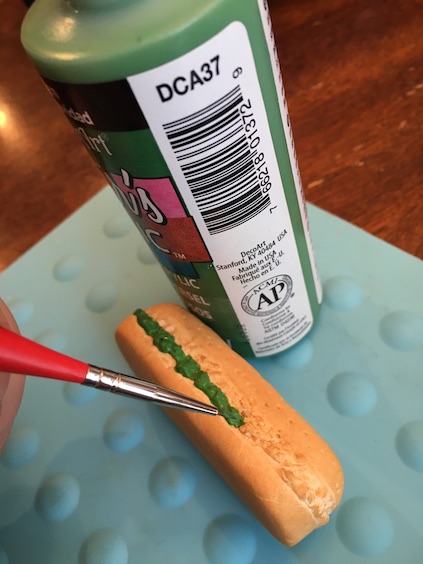
Step 10: Paint half of the sandwich filling green for lettuce. I suggest investing in a very tiny detail paintbrush for painting doll food. Mine costed $2.99 at Michael’s, and it’s worth every penny. If there’s something that I can’t stand it’s a paintbrush that just won’t paint inside the lines, so this is a lifesaver. 🙂
Paint the other half of the filling pink for ham. If you don’t want ham sandwiches you can always paint orange cheese, and red tomato, or brown roast beef, or whatever your dolls like on their sandwiches. 🙂
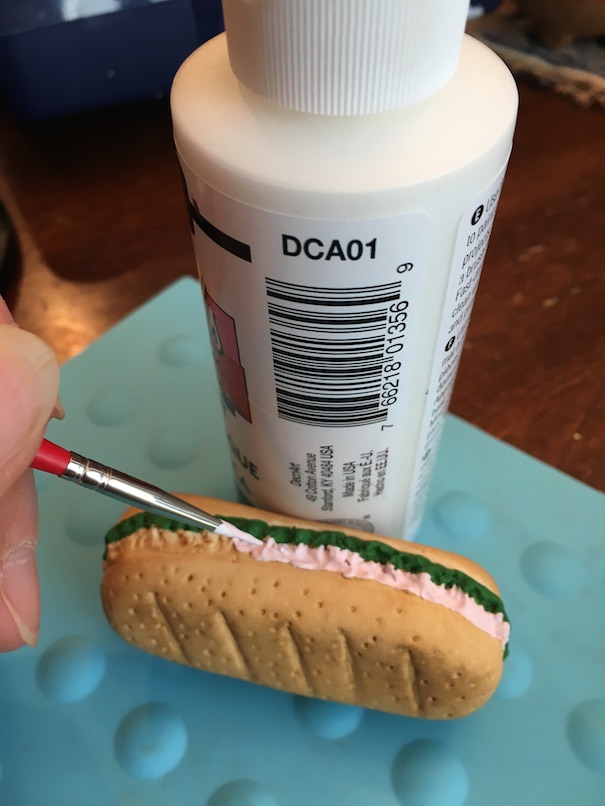
Step 11: Varnish. I think I might get a spray varnish for these. And you’re done!! 
These are so easy to make, and the results are adorable! Our dolls are enjoying their submarine sandwiches very much. 🙂 ❤
TACOS
UPDATE ALERT!!! I have discovered an even easier way to make doll tacos! You can find the newly revised tutorial HERE.
To make doll tacos you will need:
White Model Magic Air Dry Clay
Toothpick
Acrylic Paint/tiny paintbrush
Butter knife
Small clay rolling pin
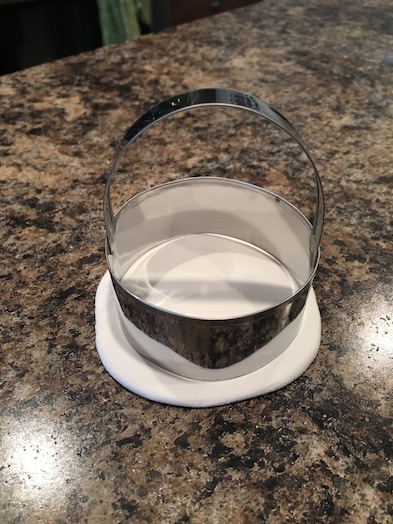
Round circle cutter (2.25 inch diameter)
Clear gloss varnish
Okay, let’s begin!
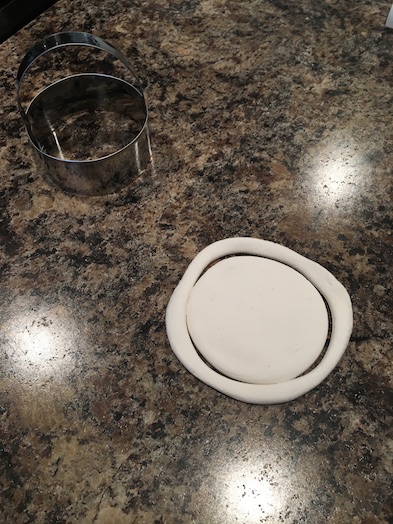
Step 1: Use your clay roller to roll your clay out 1/8″ flat. Use the round circle cutter to cut out a circle.
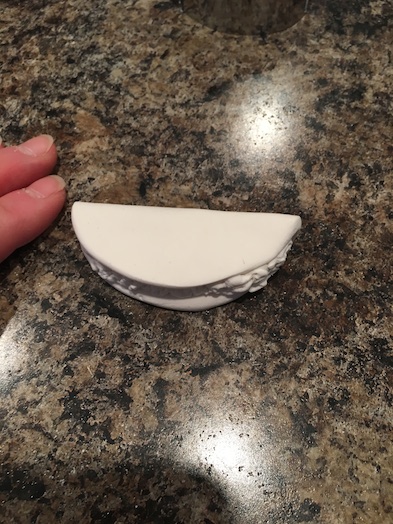
Step 2: Shape your taco shell. I made my tacos with flat bottoms so that they could stand up in the tray, but you don’t have to. 
Step 3: Take another piece of clay, and roll it into a snake. 
Step 4: Use a butter knife to shred off bits of the snake until you get a good sized pile.


Step 5: Take your pile of clay bits, and use them to fill your taco shell. 
Step 6: Gently pinch your taco shell closed, shaping it as you go. The filling should ooze up and out of the top. Carefully smooth out each side of your taco by laying it on a flat surface and rolling your clay roller very gently on top.
Step 7: Use a toothpick to texture the taco filling a bit.
Then set aside to dry completely overnight, or longer. Our taco dimensions are 2.5 inches long and 1 inch high. 
Step 8 Once your taco is dry, paint the shell. I mixed some yellow, brown, and orange paint to get a taco shell colour. I used my tiny detail paintbrush to get in the spaces at the top of the shell. It’s not perfect, but who is? 😛 It doesn’t matter at this point anyway, since the filling will be painted. 
Step 9: Paint the filling inside your taco green. A tiny detail paintbrush works well for this. 
Step 10: Paint flecks of brown on top for meat.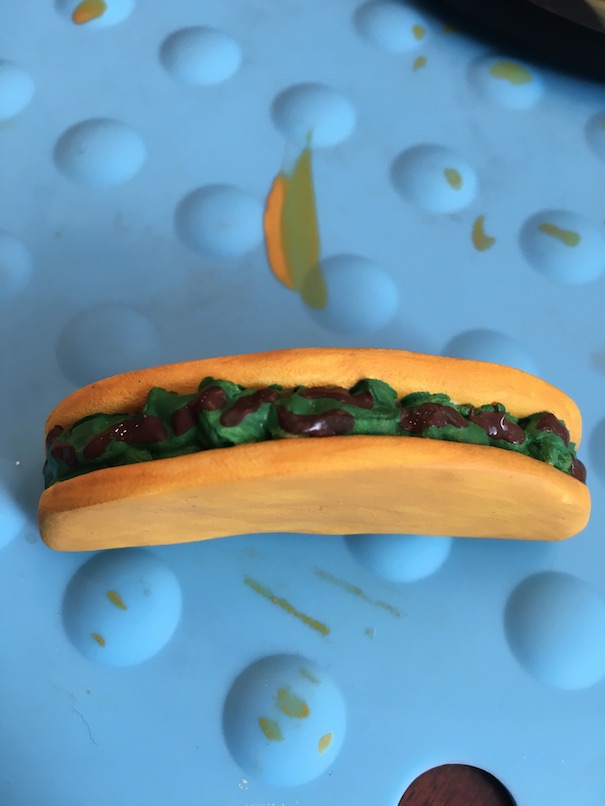
Paint dots of red for tomato.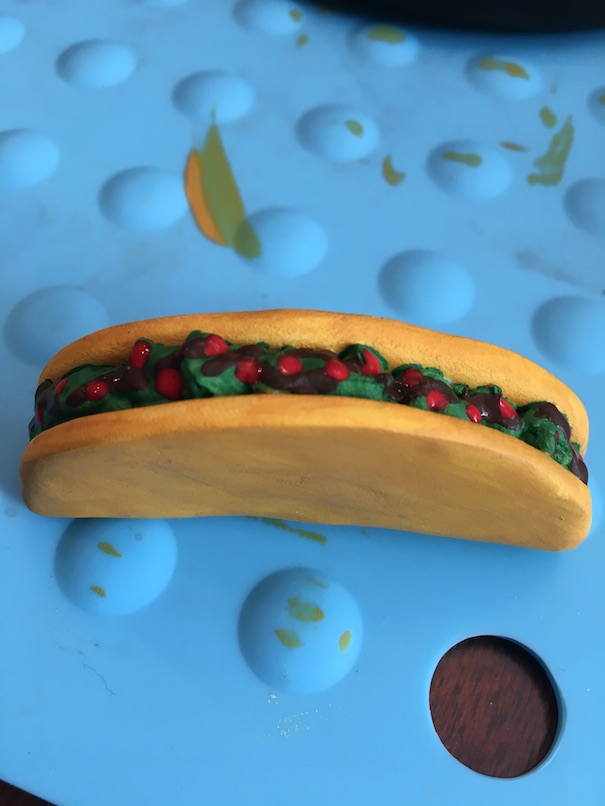
Paint dashes of orange for cheese.
Be sure that you don’t completely cover the green of the lettuce.
Step 11: Varnish. And you’re done! 🙂 
Here is our Lea Sophia in line at the school cafeteria. Today is tacos or submarine sandwiches. There are also some pretty tarts for dessert. 🙂 ❤ 
What to choose? What to choose?
“Well, I don’t think that I will be able to eat one of those sandwiches and a taco. I still want to have room for dessert,” Lea thinks to herself.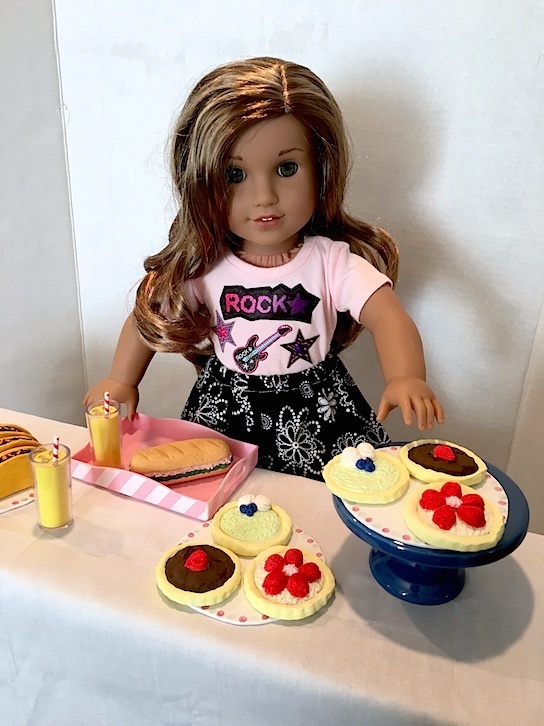
She finally decides on a submarine sandwich. Now on to the dessert tray. Oh dear! So many choices! What to choose? What to choose? ❤
I hope that your dolls enjoyed making sandwiches and tacos with us today!
Stay tuned for more Model Magic tutorials coming soon as we will be showing you how to make tasty tarts for your dolls! Have a crafty kind of day!
Leave a comment below!
❤ ❤ ❤

OMG! your sub sandwiches look good enough to eat! Fantastic job.
LikeLiked by 1 person
Thank you so much!! 🙂
LikeLike
Looks delicious! Well done!
LikeLike
So adorable! I totally need some Model Magic now!
LikeLiked by 1 person
Yes! We always buy it when it is on sale at Michael’s buy one get one half off, but it’s quite affordable anyway. It also dries as hard as a rock if you leave it out long enough. At first I was like, well this is no good, it’s all spongy and weird, but by the end of the week everything is dried rock hard.
LikeLiked by 1 person
Wow! Love these! They turned out amazing!! We purchased some clay and have this on our list of things to do. I hope ours turn out. 😛
LikeLiked by 1 person
That’s awesome! Fingers crossed for you! I hope they turn out too! 🙂
LikeLike
Great tutorial, my dolls will be able to eat thanks to you ! thank you very much 🙂
LikeLiked by 1 person
Aww, you’re so welcome! I’m so glad the dolls won’t go hungry. 😉 ❤
LikeLike
These are so cute! I’ll totally have to make them. 🙂 You should make an Etsy shop!
LikeLiked by 1 person
Awww thank you! With everything that I always have on the go, I don’t think I have time for an Etsy shop! LOL!
LikeLiked by 1 person
😀 😉
LikeLike
Great tutorial!
LikeLiked by 1 person
Thank you! 🙂 ❤
LikeLike